MASVC

Would you like to react to this message? Create an account in a few clicks or log in to continue.

Marine Aquarium Society of Ventura County

Log in

I forgot my password

May 2024

SunMonTueWedThuFriSat
   1234
567891011
12131415161718
19202122232425
262728293031 

Calendar Calendar

Number of site visitors


+3
shrum1340
nikecivic
jeffmw12
7 posters

    135g Build

    avatar
    jeffmw12
    Donating Member


    Posts : 70
    Join date : 2012-10-16
    Age : 32
    Location : Simi Valley

    135g Build  Empty 135g Build

    Post by jeffmw12 Thu May 23, 2013 6:11 pm

    So I started by getting the tank from Mike
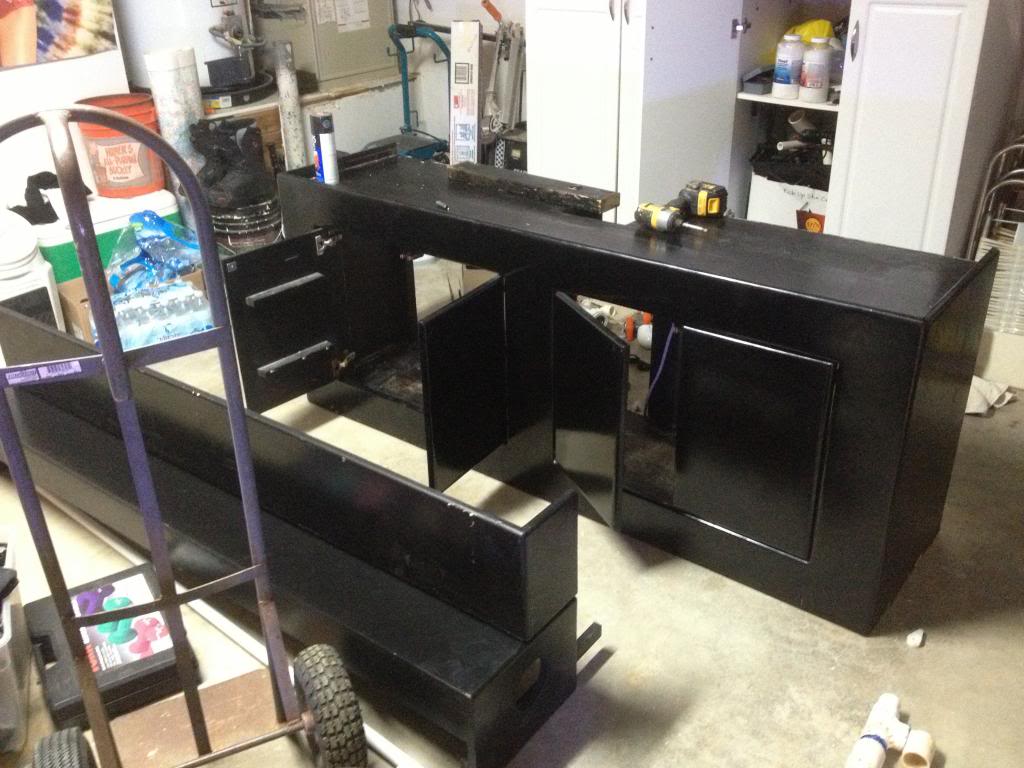
    Black Stand and canopy
    135g Build  Build4_zps376c043a
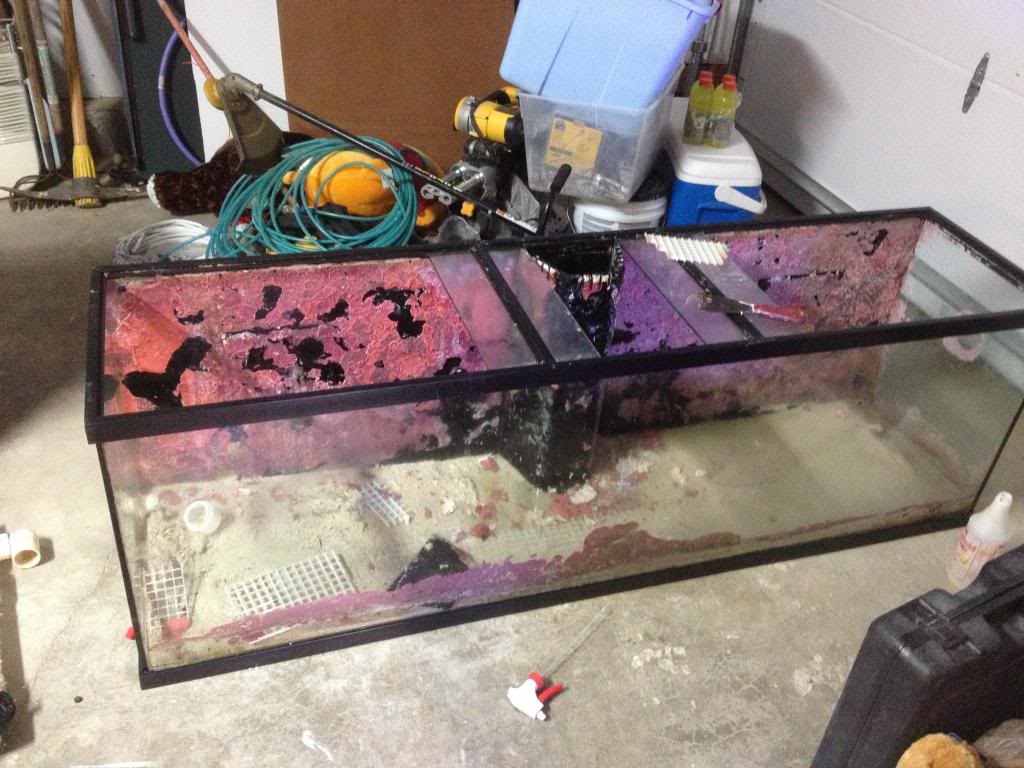
    Way to much coarlline algae.
    135g Build  Build3_zps633f4d92
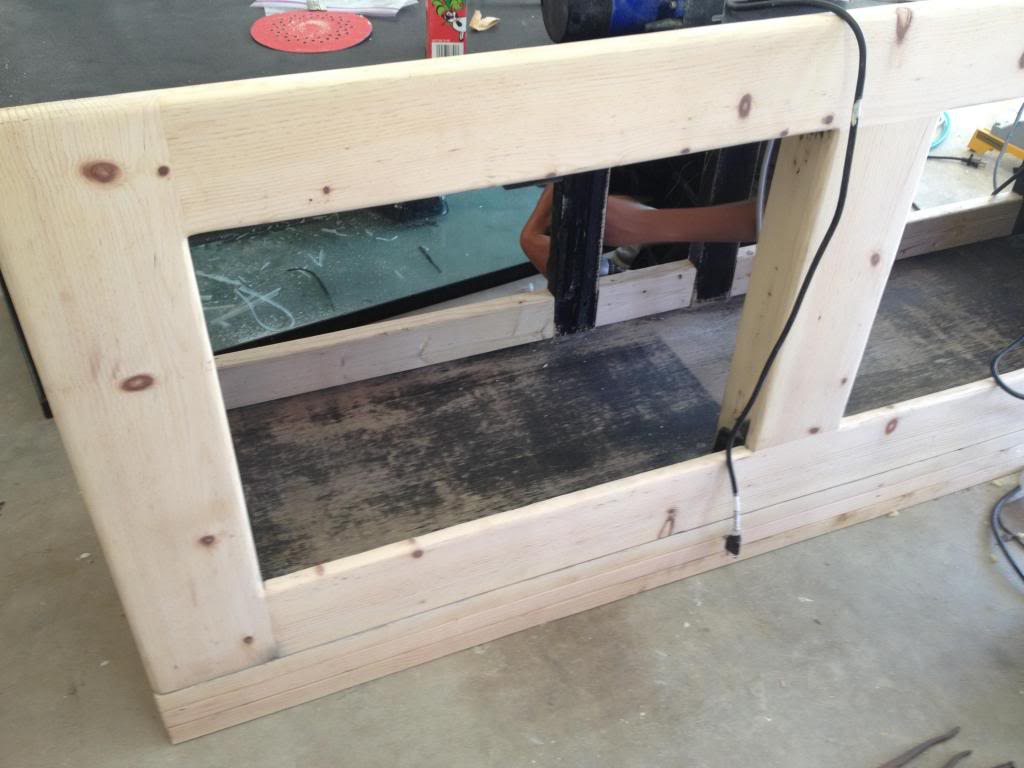
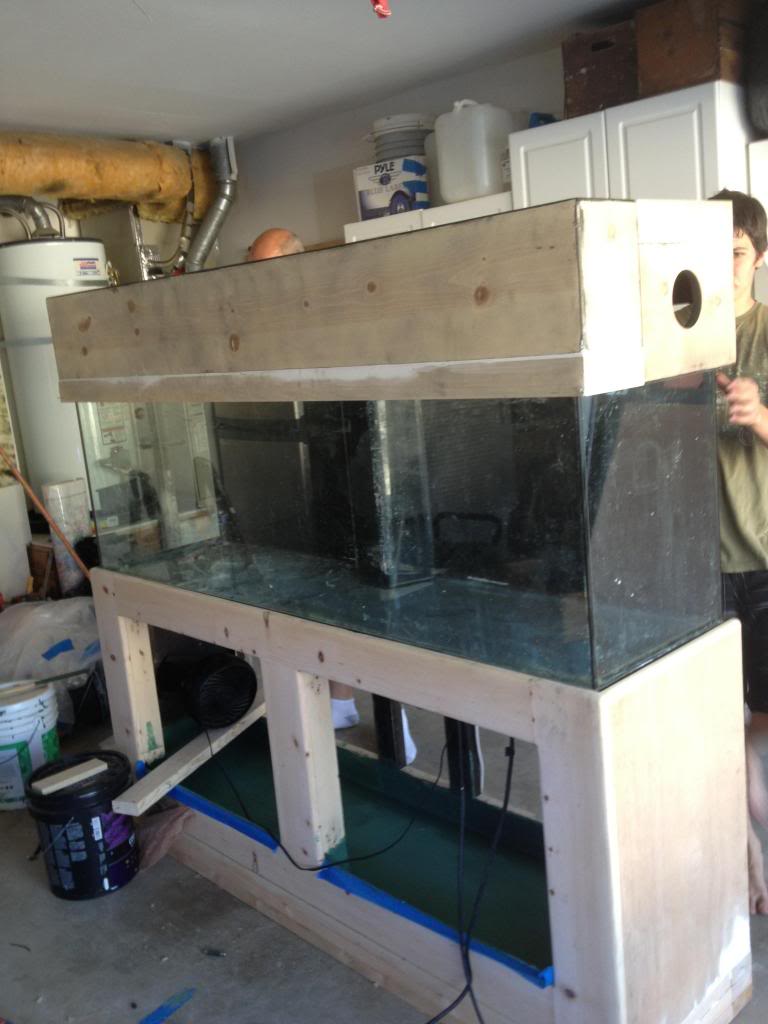
    I wanted to build a new stand and canopy but just decided to restore the old. I started by adding three 2by4's to the bottom of the tank to add some height (later on i added some base board to cover it). Also I added some 2by4's to the back because I wanted to create a place to waterproof the inside just in case some water leaks out and as you can see started sanding away.
    135g Build  Build5_zps750cf98e
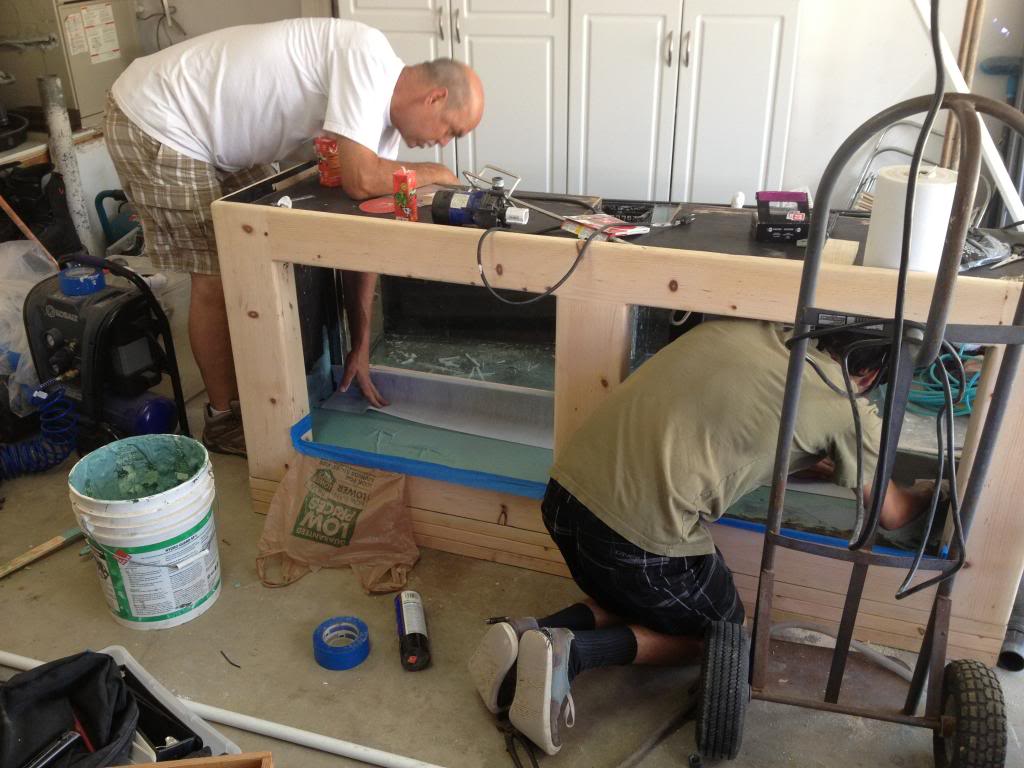
    Started to waterproof it! Well my dad and brother did it.

    135g Build  Build6_zps1f52ab5c

    Got all the coralline algae off, put the hood on and added 2 1/2 inches to the height of the hood. Sanded the hood.
    135g Build  Build9_zpsb48addc2
    Side Pic! Before
    135g Build  Build11_zps467a92dd
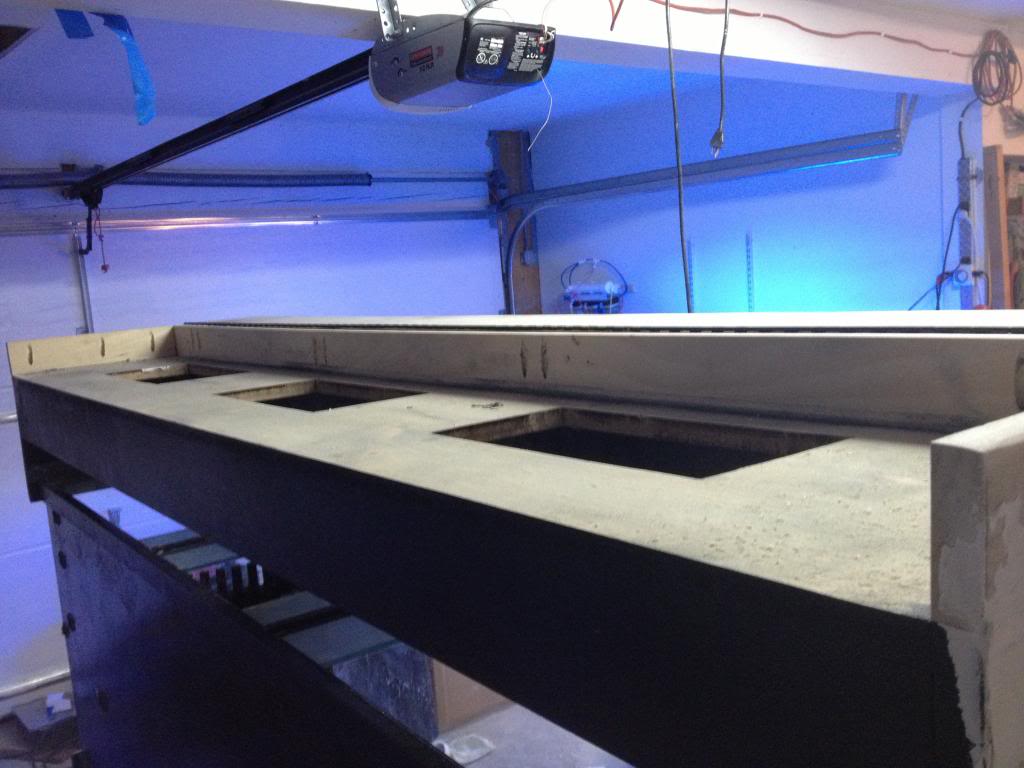
    Side pic! After Added the piece of wood so it can sit up against the wall. All the plumbing will be glued and testing before so i will have to problems with leaks. If I had to I can reach down from the top too.
    135g Build  Build12_zpsf849531c
    Cut out for fans.
    135g Build  Build13_zps8f54ba3d
    Cut out hole for my LEDs to sit on top.
    135g Build  Photo-299_zps9f140f1b

    More to come. paint is next and plumbing
    nikecivic
    nikecivic
    Moderator


    Posts : 1672
    Join date : 2011-11-09
    Location : Camarillo, CA

    135g Build  Empty Re: 135g Build

    Post by nikecivic Thu May 23, 2013 8:21 pm

    Wow, looks great! The coralline must've been a pain to scrape off!
    shrum1340
    shrum1340


    Posts : 282
    Join date : 2012-02-01
    Location : Ventura

    135g Build  Empty Re: 135g Build

    Post by shrum1340 Thu May 23, 2013 10:42 pm

    nikecivic wrote:Wow, looks great! The coralline must've been a pain to scrape off!
    Vinegar works great. I did it on a small tank and it took it right off after soaking it a few days. 3 to 1 ratio is what I used. It would be $$ on that big of tank. Maybe a spay bottle at 100% would work if you kept spraying it every few hours.
    Costco has big jugs of it
    avatar
    jeffmw12
    Donating Member


    Posts : 70
    Join date : 2012-10-16
    Age : 32
    Location : Simi Valley

    135g Build  Empty 135 Build

    Post by jeffmw12 Thu May 23, 2013 11:28 pm

    Yeah its getting there. I used vinegar and it came of easier. Going to be painting it tomorrow so Ill post more pic tomorrow after.
    nikecivic
    nikecivic
    Moderator


    Posts : 1672
    Join date : 2011-11-09
    Location : Camarillo, CA

    135g Build  Empty Re: 135g Build

    Post by nikecivic Fri May 24, 2013 2:31 am

    What's the new height of the stand? I'm thinking of cutting my stand to 36" because the old stand for the 135g was only 29". Also how tall is your canopy?
    avatar
    jeffmw12
    Donating Member


    Posts : 70
    Join date : 2012-10-16
    Age : 32
    Location : Simi Valley

    135g Build  Empty 135g Build

    Post by jeffmw12 Fri May 24, 2013 10:22 pm

    The stand is now 33 inches tall and the canopy is 12 inches tall. The lights sit about 10 inches off the water line. I would go to 36 inches for the stand. I got baseboard to match the house and it is only 5 inches so I could only raise the stand to 33 inches.
    nikecivic
    nikecivic
    Moderator


    Posts : 1672
    Join date : 2011-11-09
    Location : Camarillo, CA

    135g Build  Empty Re: 135g Build

    Post by nikecivic Sat May 25, 2013 12:20 am

    jeffmw12 wrote:The stand is now 33 inches tall and the canopy is 12 inches tall. The lights sit about 10 inches off the water line. I would go to 36 inches for the stand. I got baseboard to match the house and it is only 5 inches so I could only raise the stand to 33 inches.

    Cool, I'm planning to change the height of my stand from 42" to 36".
    Crusty Old Shellback
    Crusty Old Shellback
    Charter Member


    Posts : 684
    Join date : 2011-07-27
    Location : Oxnard

    135g Build  Empty Re: 135g Build

    Post by Crusty Old Shellback Tue May 28, 2013 9:20 am

    Sounds like you want me to cut up that beautiful stand I built? Call me later.
    sisterlimonpot
    sisterlimonpot
    Admin


    Posts : 1576
    Join date : 2011-07-25
    Location : Oxnard

    135g Build  Empty Re: 135g Build

    Post by sisterlimonpot Mon Jun 03, 2013 10:55 am

    Looking good, after looking at the first photo of the tank, i knew right away who's tank that was...
    avatar
    jeffmw12
    Donating Member


    Posts : 70
    Join date : 2012-10-16
    Age : 32
    Location : Simi Valley

    135g Build  Empty Tank Finnished

    Post by jeffmw12 Wed Aug 28, 2013 11:57 pm

    Okay its now been some time and the tank is finished. I let the tank cycle for one month and than added a few fish and cheap frags to see what would happen, they were doing fine. After biting the bullet I bought a new protein skimmer (bubble magus Curve 9). Things a beast and works great. Once I was ready to make the full shift I bought a Naso tang and added all my fish. Than added all of my coral and inverts to the tank. I was nervous because my 75g was bullet proof (I felt) I only added cal and alk, did few water changes only 5g hear and there and cleaned the glass. It took me two day to move everything over and my 75g was now shut down. I dried out my sand and all the rock as I used all new rock for my 135g and new sand. So far I have been doing little maintenance on my 135, I know I should be doing more but I'm a big fan of "if its not broken why fix it" (or however the sang goes... Lol). I was trying to plan on doing water changes for the first couple of months but I have no time... So with my 135 I now add BRS cal, alk and mag. I feed every day or every other day, add nori for my tangs but all my fish eat it. I run gfo and carbon. I have a refugium, a filter sock (pain in the a**) bubble magus curve 9, external return pump than feeds the reactor. I don't know the true amount of water the pump pushes through the tank every hour but if I have to guess it would be about 700-900???? I run four power heads in the tank 2 1600 and 2 1250 made by Aqueon (no problems so far). lighting is 3 120w led Chinese ones. I have great growth and so far so good. I run an JBJ ATO and a reefkeeper lite. There are two fans in the hood and going to get a chiller for it soon... I think that's all....

    135g Build  Photo1_zpse55d4600

    135g Build  Photo2_zps00540de5

    135g Build  Photo3_zps96d6303c

    135g Build  Photo4_zpsbccc24fe

    135g Build  Photo5_zpsca6b3f8a

    135g Build  Photo6_zps638f7216

    135g Build  Photo7_zpscdf873f0

    135g Build  Photo8_zpsd854d4c6
    avatar
    bvysochin


    Posts : 86
    Join date : 2011-11-29

    135g Build  Empty Re: 135g Build

    Post by bvysochin Thu Aug 29, 2013 12:05 am

    Cool nem. Nice Florida's.
    ianmcalpin
    ianmcalpin


    Posts : 141
    Join date : 2013-08-02
    Location : oxnard

    135g Build  Empty Re: 135g Build

    Post by ianmcalpin Thu Aug 29, 2013 2:32 am

    beautiful tank build me personally couldnt handle that tall of a tank lol because im a short dude i would need a step stool to put things in and cleaning but loving the tank build.

    Sponsored content


    135g Build  Empty Re: 135g Build

    Post by Sponsored content


      Current date/time is Fri May 17, 2024 6:44 am